Miele dishwasher is loved by the user for its efficiency and longevity. This brand of washer has a self-diagnostic mechanism, which helps users diagnose faults know faults within the washer after running a short diagnosis. In most cases, the washer’s self-diagnosis mechanism picks up a fault within the washer, interprets it, and shows it as an error code in its display screen. In some cases, the dishwasher’s intake/drain lights blink, and the washer beeps to indicate a fault. When an error code shows on the display screen, you need to read and interpret it before you begin the repair process.
To understand your dishwasher’s error code, you need to be aware of your washer’s model number. Different Miele washers have different procedures for running the service mode. Through the service mode, you can learn the registered error codes and work on them to restore your washer to its optimum efficiency. While we will not explore all models of dishwasher’s we will look at how to enter service mode on Miele dishwasher Inspira and Advanta – G 118x/G 2170/G 218x, because it is one of the most common washer models in many homes.
How to Enter Service Mode
To udnerstand the F14 error code or any error code that you get on your Miele dishwasher, you need to enter service mode. Service Mode allows you to temporarily test all the parts of the machine and understand the error code.
To enter the service mode on Miele dishwasher Inspira and Advanta – G 118x/G 2170/G 218x, you will need:
- To open the washer’s door
- Turn off the washer by unplugging it from its power source
- Press the program button and hold it in
- Turn on the appliance by plugging it back into its power source
- Release your washer’s program button
- Press your washer’s program button three times and hold it on the third time until its Rinse & Hold LED flashes
- Let go of your washer’s program button
- If your washer’s Rinse & Hold LED fails to light, repeat this procedure
- If your washer’s Rinse & Hold LED flashes slowly, it indicates a successful enter
- Press your washer’s program button 1x
- If its SaniWash LED shows an error, examine if more errors were recorded
- Press and hold your washer’s program button until its intake/drain LED lights
- Later, press your washer’s program button, briefly
- Press and hold your washer’s program button until its intake/drain LED lights up to delete the appliance’s error code memory
- Follow this by pressing and holding your washer’s program button until its SaniWash LED turns off
This procedure is not a one fit all solution. Each washer model has a unique procedure for entering the service mode. You have to be sure of your washer model before attempting to enter its service mode.
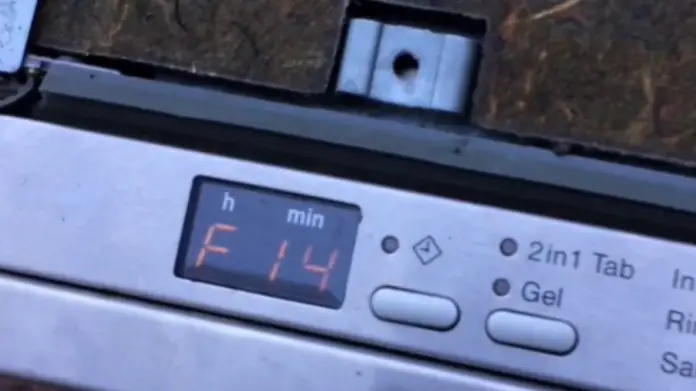
What Does F14 Mean On Miele Dishwasher
The F14 error code shows on your washer’s display screen when the washer’s program is interrupted and its drain pump operated. When the circulation pump operates after your washer’s water intake step, the appliances heater pressure switch is examined to ensure the required water pressure is available in the washer’s wash water circuit. For this reason, the washer’s heater relays need to be activated. For this error code to appear on your washer’s display screen, your washer heater switch might have picked insufficient or no water pressure in your wash water circulation pump.
F14 Error Code Symptoms
If there’s a problem with the circllation pump on your Miele dishwahers circlualtion pump, you’ll notice a few symptoms.
- Your Miele dishwasher stops the washing cycle and on checking, you notice no water is getting pumped during the cycle.
- The wash arm(s) are not spinning – if the dishwasher circulation pump is clogged, it won’t put out sufficient pressure to rotate the arms.
- If the wash motor is good (you can run the diagnostics feature to check if the wash motor is working) and the drain pump works but no water sprays in your dishwasher after filling up, then probably you are looking at a troubled circulation pump.
F14 Miele Error Code – Problems With The Circulation Pump
Circulation Pump Dirty
Before you order a new circulation pump, you need to consider cleaning your current circulation pump because this usually fixes the problem. You need to completley disassemble the circulation pump and take a good look at verything.Once you remove the wire harness clip that gives the entire unit power, the motor unclips behond the impeller and detaches from the entire pump. Once the motor is partially removed, you need to pull rotor out of the plastic barrel. This is the cylinder attatched to the round part that’s attatched to the impeller. You need to clean the entire barrel, shaft and rotor. Then you need to add some lubricant to the movable parts of the pump. Once done, put everything back together and you should find that the circulation pump is working perfectly.
This is the first thing you need to do before you consider buying a new circulation pump. Even though it doesn’t look dirst and it seems like it would work perfectly, cleaning it and adding some lubricant will allow the motor to initiate spinning mcuh easier. If you don’t feel like you cant diassemble the circulation pump, then you can replace it.
Blockage In Circulation Pump
A blockage in the impeller on the ciruclation pump can cause the F14 error. To remove any potential blockages, you need to disconnect your dishwasher from the electric supply and the water supply. Then, turn the machine uoside down and remove the bottom panel. Remove the circulation pump that’s secured by a screw in the back panel. Wiggle the circulation pump away and remove the packaging piece that fits between end of the circulation pump and the dishwasher casing. Locate the ciruclation pump on the bench, remove the 2 screws and prise open the two small clamps to remove the end of the pump. Once removed, clean the end of the impeller and remove any blockages or debris in the ciruclation pump.
Ciruculation Pump Impeller Stuck
If you’ve noticed that the pump is making a humming sound, the impeller may be stuck on something. If this is the case, you need to remove the spray at the bottom then connect a hose to your kitchen faucet. Force water through the hole where the sprayer was attached. Once you do that, you may notice some debris get rinsed out of the pump – and this could have been the issue. Once all of the debris is out, then the pump motor might start to work again. If it was a case of the motor being stuck, the chances of the pump being damaged is low – you simply need to get rid of the stuck debris.
To prevent debris from being stuck in the pump, you need to keep the screens and filters clean. Mineral deposits can buildup which can cause the pump impeller to become stuck, the chances of this happening are also higher if you live in an area with hard water. Removing mineral deposits from the filter and screens that cause the impeller to be stuck can be done with vinegar. You need to soak the inlet to the pump in viegar for a few hours. You can remove the pump using a flat head screw driver and trying to spin it.
Once the inlet to the pump has been soaked in vinegar for at least two hours, check to see if the impeller will start to turn much more easily. You’ll notice that it resists a lot less. Once removed, you need to reinstall it and check if it starts working like new.
Testing If The Circulation Pump Is Damaged
To test if the circulation pump is damaged, you need to dismantle it and test it with a multimeter (view on Amazon). A multimeter will allow you to measure two or more electrical values. This is used to measure voltage (volts), current (amps) and resistance (ohms). The readings you get will allow you to diagnose if there’s a problem with the circulation pump because you can compare it against standards.
You need:
- Screwdriver
- Pair of pliers
- Multimeter
To take out the circulation to test it:
- Unplug the dishwasher.
- Pull it out.
- Lay it on its side.
- Remove the dishwasher’s base plate by using your screwdriver to remove its screws first.
- Disconnect anti-flood switch connectors and set them aside. Also look for any other connector and disconnect it
- Locate the motor and the clamps on the hoses connected to the circulation pump.
- Remove the clamps and hoses with the pliers.
- Un-couple the ground wire to the pump and disconnect the necessary connectors.
- Remove the screw that holds the circulation pump. You’ll find this on the outer side of the circulation pump.
- Take the motor out and remove the hoses connecting to the circulation pump. Your pliers will help you do this.
- You can now take out the circulation pump.
Test the circulation pump with the multimeter:
- Disconnect the motor’s two wire leads from the wiring harness.
- Select your multimeter to the ohms setting.
- To measure the resistance on the part’s terminals, touch the probes on the terminals and check the reading.
- Look for 100 OHMs. If you receive anything considerably lower than this, it needs to be replaced.
Note: While you have access to the motor, check if the motor is seized by inserting the screwdriver into the motor’s spindle slot and trying to rotate it. You should notice that the spindle slot spins freely and if it doesn’t, you need to replce it.
Fixing Miele F14 Dishwahser Error Code
Before you think about getting a new circulation pump, you can try some fixes that’ll clear up the F14 error code.
Inspect your washer’s dispensing of rinse aid and detergent:
- Excess foam buildup shows that the pressure at your heater pressure switch will be lowered.
- Look for the correct water level in your machine. Ideally, the level of water should be slightly below the filter arm.
- Inspect all filters and ensure they are not blocked.
- Inspect if your circulation pump is broken by carrying out the following procedure:
- Open your dishwasher’s door and put the bypass tool within its latching mechanism.
- Switch on your dishwasher and choose the start wash program. Start.
- Pay close attention to your washer’s lower spray arm after the thirty-second drain step. The circulation pump needs to be operating as water flows into the cabinet, increasing the pressure of water flow. A small stream of water should ideally be coming out of your lower spray arm.
- When water flows out of the spray arm, the washer’s circulation pump operates as expected, and the system has no blockage, press your appliance’s door handle to release the bypass tool from the door lock.
- If there is no water, continue with the troubleshooting.
Start the senor wash program:
- Start the senor wash program, you should hear the dishwasher draining any water leftover from the previous load.
- Wait 10-20 seconds after the machine starts filling again.
- Open the door.
- Pour 4 litres of cold water in.
- Close the door & program continues on automatically.
This fault is caused when the heater pressure switch B1/13 is broken or blocked by foreign objects. Fix it by examining the heater pressure switch. You also need to examine the wiring harness and connection plug. If necessary, replace your heater pressure switch.
Other Miele Dishwasher Error Codes and Fixes
Fault F14 or Fault F69 – Blocked Circulation Pump
This fault code shows on your washer display screen when the appliance’s circulation pump jams or sticks.
Process of Fixing & Clearing the Error Code
- Begin by removing your washer filter combination.
- Pour one liter of warm water and add three to five drops of rinse aid into your washer interior. Let it soak for five minutes.
- Begin the program and repeat this procedure three times.
- Switch off your dishwasher and then switch it back on. Choose your desired program using a program selector button and then press the start/stop button to run it.
Other than this, there are other fault codes closely related to the f14 fault code that will help you better understand your washer.
Fault code F11 – Water not draining Away
This error code shows on the display screen when its filter combination found in its cabinet is blocked.
Process of Fixing & Clearing the Error Code
- Begin by cleaning the filter combination. Use your owner’s manual to clean the filter combination in your washer.
- Remove any object that is blocking your washer’s drain pump. In most cases, a piece of glass blocks the drain pump hindering it from draining properly.
- Straighten and unclog a kinked and blocked hose, respectively.
- Inspect your drain hose and the washer’s drainage for blockages and wash it. In some cases, there might be a deposit buildup in your washer’s drain hose or its drain system that must be cleaned to restore your washer’s draining capacity to normal.
Fault Code F12 or F13 – Faulty Water Intake
This error is caused when the washer’s stopcock is closed.
Process of Fixing & Clearing the Error Code
- Turn on your washer’s water supply from the stopcock to allow water to flow into the washer.
- Clean a clogged water inlet filter (view on Amazon) to allow a steady flow of water into the washer
- In case your washer’s inlet hose has kinks, you need to straighten it to eliminate the sharp loops and kinks in the inlet hose.
- Check the supply flow pressure of your washer and ensure it is above 30 kPa (0.3 bar). If it is lower than this, you need to call a qualified plumber to fix it.
Fault Code F52 – Excess Foam Suds in Cabinet
This error code shows on the display screen when the washer’s sensor picks up signs of excess foam suds in the appliance’s cabinet, interrupting the program.
Process of Fixing & Clearing the Error Code
Begin by turning the selector switch of your washer to Finish/Stop. Lightly touch your washer’s buttons press Start/Stop button for 1 second to stop the washer’s LED flashing.
This should be followed by turning your dishwasher off before turning it on once again.
When you are using detergent tablets containing rinse aid, you should set your washer to the Combi Tablet Program. Avoid using detergent tablets with quick wash 40 degrees Celsius program.
Fault Code F01 or F02 – Leads Short-Circuited or Water/Heating NTC
This fault code is caused when the NTC temperature sensor R30 or any of its connections leads to an open circuit or short circuit. When this error code is registered, its heating will fail to activate, and your washer’s rinse aid will not be dispensed.
Process of Fixing & Clearing the Error Code
- Begin by examining the temperature sensor of your washer and all its leads for continuity
- Your washer’s temperature sensor resistance needs to be about 14.9k (± 750) at 20°C (68°F). At 77°F (25°C), approximately 12k (± 600)
- Inspect your washer’s plug connections
- Replace your washer’s temperature sensor where necessary
Lower Spray Arm Blocked or Middle Spray Arm Blocked
This fault code is caused by an obstructed bottom or middle spray arm.
Process of Fixing & Clearing the Error Code
- Begin by rearranging content within the washer to remove the obstruction
- If the lower or middle spray arm water jets are blocked, turn off your washer and remove the spray arms. Rinse these arms under running water. Fix the spray arms back in position and inspect if they rotate.
Fault Code F13: Water Intake Fault at the end of Step
Your washer’s program is interrupted while the drain pump operated. After 2 to 4 minutes, your washer’s buzzer is activated for 120 seconds.
This error code is picked up by the machine’s self-diagnosis mechanism if the desired number of pulses within the washer is not detected within a specified amount of time, with a maximum of four minutes. The number of pulses varies based on your washer’s program.
If your selected program begins with a water softener’s flushing cycle, the error code register inspection is conducted sooner. In case of an error, the chose program will be interrupted after half a minute, and the error will be shown.
When this error code shows on your washer’s display screen, it indicates that the:
- On-site supply of water is faulty
- The water inlet valve is broken
- Flowmeter B3/4 is not supplying the required amount of pulses
